What could possibly make brownies even more exciting? Well, I was sitting, thinking what I could do to them. And I thought, why not make them red? So that's exactly what I did (and I'm sure I'm not the first person to think of it, but I was still excited). I decided to make them less gooey, and more cakey. And red. The colour of love. And I sure do love these Red Velvet Brownies!
I forgot to take some photos earlier in the process of making these...mainly because I was on the phone to the Boy at the time...but I remembered not to far in! These are a little bit more involved than the recipe I posted earlier, but look (and taste) amazing. I know, I know, 2 brownie recipes in 1 week...but, really, these are red! Plus, I bought myself a new brownie pan, and wanted to break it in :)
Ingredients
1 cup unsalted butter, room temperature
1 1/2 cups caster sugar
1 1/2 cups brown sugar
4 eggs
1 50ml bottle of Pillar Box Red food colouring
4 tsp vanilla extract
2 1/2 cups plain flour
6 tbsp cocoa
1/2 tsp salt
Method
Preheat your oven to 180C and grease and line your pan (or pans). With an electric mixer, beat your butter and both sugars together until pale and fluffy (it will kinda look like sand). Then, add your eggs. Add these 1 at a time, beating after each egg.
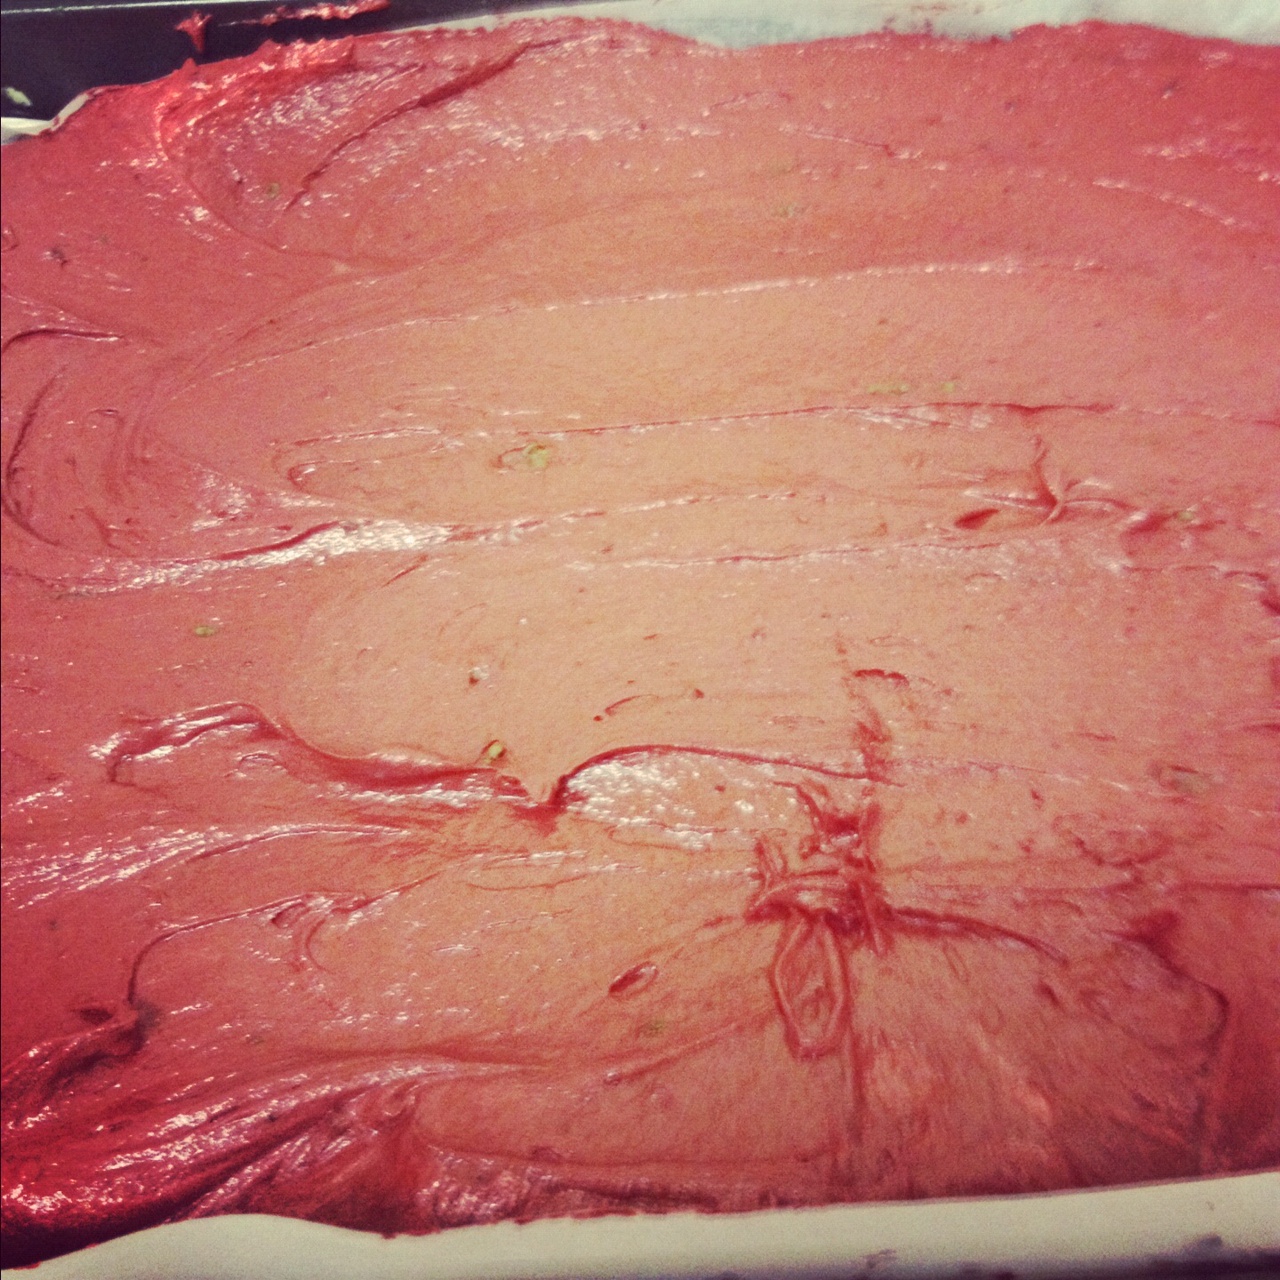
Combine your flour, cocoa and salt in a separate bowl, and slowly add to the batter. You may need to scrape the sides of the bowl a bit here to make sure it's all in there. Beat until all the flour is combined. It should look something like this
Nice and pale and smooth. Next add your vanilla and your food colouring. Now, I mix the food colouring through the batter a bit before using the mixer. Otherwise red dye flies everywhere. Mix the food colouring until it is just combined. Don't overwork the batter.
Mix it round a bit with a plastic spatula, just to make sure it's all combined, then pour the batter into your prepared tin. It's quite thick, so you may need to spread it out with a spatula so it's nice and even in the tin
And then, as if making them red wasn't indulgent enough for me (and we all know it's not) I sprinkled some milk choc chips (the ones that hold their shape) over the top of the mixture.
Pop it in the oven and bake for about 30 minutes, or until a skewer inserted comes out clean. Once it's done, leave it to cool in the tin, and then slice into bars and serve.
As I said earlier, these are a little bit more cake like than the ones I made earlier in the week, but they taste just as good, and they look amazing (even if I do say so myself)
I've been fantasising a lot about soup lately. Really comforting, hearty, melt in your mouth, vegetable soup. And finally, I could hold out no longer! And, while the days are still warm, the nights are getting cold, and there is no better cure for a cold night and a hungry tummy!
This is probably the easiest thing you can make. You really can't get it wrong. You can use any vegetables that take your fancy. I put all the vegetables that the Boy won't usually eat in it, because the vegetables go so tender and flavoursome, that people can't help but eat things they think they don't like. And, it's cheap to make. This recipe will get you 6 large helpings. The measurements below are just a guide, add in and take away as you please! (and when I say 'cubed' I mean roughoddsizedhowevertheycome cubes)
Ingredients
Slug of olive oil
1 large onion, diced
1 red chili, deseeded and chopped
1 clove garlic, crushed
Dried basil
Dried oregano
2 carrots, peeled and chopped
2 celery stalks, chopped
1 leek, chopped
1/2 purple sweet potato, peeled and cubed
2 parsnips, peeled and chopped
3 largish potatoes, peeled and cubed
1 turnip, peeled and cubed
1 bunch of broccolini, stalks removed
1 litre salt reduced chicken stock (can use vegetable stock)
1 can of cannellini beans (optional)
salt and pepper
Crusty, delicious, fresh bread
Method
First things first, peel and chop all your veg. Put a large pot on the stove over medium heat. Add a slug of oil and your onions, garlic and chili. Cook until onion is soft, and fragrant. Then a good shake of your basil and oregano, add your carrots, celery and leek. Cook, stirring occasionally, for a few minutes. Add the rest of your vegetables (except the broccolini) into your pot. Mix them around a bit, and pour over your stock. Add 2 cups of water. Drain and rinse your beans, and add them to the mix with a good pinch of salt, and some ground black pepper. Turn the heat up to high, clamp on a lid, and bring to the boil. Boil for 5 minutes or so, and then reduce heat to medium-low, pop the lid back on, and let it simmer away for a good half hour. Stir it round every now and then.


Really, you just want your vegetables to be beautifully tender. Once they are, add the broccolini, pop the lid back on, and let them cook for a couple of minutes. You still want them to be slightly crunchy. And, the soup is done. Ladle into bowls, add a good grind of pepper, cut up some bread, and serve.
It's such a rich, beautiful flavour, and the vegetables are so tender and melt in your mouth! I'm looking forward to left overs for dinner tonight!
I didn't actually eat any banoffee pie for breakfast, but the friends I made it for did. And I can't say I blame them, bananas, toffee, cream...perfect Sunday morning breakfast fare!
I'm going through a stage at the moment, where I cannot get enough of cooking and baking. Whenever I'm not doing it, I think about what I'm going to make next. This is good. I lost it for a while there and didn't cook or bake for AGES. I think I'm making up for it now. This should mean many more blog posts and much more yumminess. Starting today! With Banoffee Pie.
Lots of people don't like banoffee pie. I don't know why. It's got caramel, it's got bananas, it's got cream. It's delicious!
Ingredients
Sweet tart cases. You can make your own tart cases with either store bought pastry (but please use Careme Vanilla Bean Shortcrust, or another good quality pastry, not pampas), or you can make your own pastry. I don't have a food processor (I'm holding off till I can get a pink KitchenAid one, to match my mixer) so I find it really hard to make my own. Plus, I like shortcuts.
Bananas, about 5 small to medium sized ones
1/2 cup brown sugar (either dark or light, doesn't matter)
395g Sweetened condensed milk
125g unsalted butter
1 cup whipping cream
Method
Prepare your pastry cases, I made individual pies this time. But you can make one big pie, and pile it high with heaps of bananas and lashings of cream. Pop them in the oven. About 10 minutes at 180C is usually good, but check them after that, and if they need a bit longer, let them have it. Meanwhile, make your caramel sauce. Place a saucepan over medium heat, and combine the sugar and 3 tablespoons of water.
Stir until sugar is dissolved, and then increase the heat to high, and bring to the boil. Don't stir the caramel when it's boiling. Swirl the pan around a bit, and brush the sides with a pastry brush dipped in water. The mixture should get a little darker, and start to smell like caramel. This process should take about 5 minutes.
Then add your condensed milk and butter to the pan, and stir constantly until butter is melted, and the sauce is thickened slightly. About 5 minutes.
By this time, your pastry should be ready. So pour the caramel into a jug and fill the cases. You can fill them right to the top. And then pop them in the fridge for about an hour or so, just to set the caramel.
Slice up your bananas. Not too thin and not too thick, and pile them on top of the caramel.
Whip up your cream, and dollop it on top of the bananas.
Yum!
The boy and I took them round to our friends place on Saturday night. When we left, I left 4 little pies in their fridge for breakfast. Frankly, I think it's a brilliant breakfast food, and should be added to more breakfast menus!
The rest of the weekend was spent watching Twin Peaks, pottering around the house, and deciding what I'm going to cook this week. As the weather is (finally!) getting cooler, I can start of soups and stews. First up is a hearty, warming, Vegetable soup! mmmmm warm soup belly.
I had a pretty free afternoon yesterday, so I decided to take it off to run some errands. And make brownies. I really felt like their gooey, chewy comfort. And, you can whip them up in no time!
Ingredients
1/2 cup cocoa powder (buy the good stuff, please!)
2 cups caster sugar
1 cup unsalted butter, melted
4 eggs
1 tsp vanilla extract
1 1/2 cups plain flour
1/2 tsp baking powder
1/2 tsp salt
White chocolate chips (optional)
Milk chocolate chips (optional)
Method
Preheat the oven to 180C and grease and line a largish square baking tin (or use 2 small ones).
In a bowl, whisk together your cocoa powder and melted butter
Then add caster sugar, and mix together
Then add the rest of your dry ingredients, and mix until combined (you'll need to move from a whisk to a wooden spoon here)
Then add your eggs and vanilla extract and mix until combined.
I then like to add some white chocolate chips to my batter. I use the ones that hold their shape when baked, it just adds to the gooeiness of the brownies. You can really add anything you like here, nuts, dried fruit, anything!
And, because I'm indulgent, I also like to add milk choc chips.
Mix the choc chips into the batter, and then pour the batter into your prepared pan, or pans. You don't want it to be too thick in the pan, so if it's more than a couple of inches thick, use two pans.
Bake the brownies for about 20-30 minutes. You want them to be gooey in the centre, so I give mine a wobble after 20, and if it's too wobbly, leave it in, and check it every 5 minutes or so. The middle should be sort of firm to the touch, with a hit of wobble underneath. Even if they aren't totally gooey in the middle, they'll still be super yummy!
Leave it to cool for a little bit in the pan before transferring to a wire rack. You can slice it while its in the pan, and then transfer the pieces. Also, make sure you eat one while it's still warm. You can store these for up to a week in the fridge, and you can warm them through in the microwave to get the gooey centre back. If you are serving them for a dessert (or just want to be extra decadent) melt some chocolate and peanut butter, and pour over the brownies, then top with a dollop of vanilla ice cream.
I had been craving a steak sandwich for days, DAYS! So, when Friday rolled around, I knew there was only 1 thing to do....make myself a steak sandwich for dinner. I was looking forward to this all day. So much so that I kept checking the time, all afternoon, to see if it was dinner time yet. I managed to hold out until 7pm, which shows how much will power I have now (it also may show that I had Friday afternoon off, and had a slight nap before dinner).
This recipe is for 2 sandwiches. And, the most important thing you have to remember when cooking, is always watch out for Bunnies in your fridge.
Ingredients
1/2 tsp Dijon mustard
1/2 tsp Worcestershire sauce
1 tsp BBQ sauce
1/2 clove of garlic, crushed
2 nice looking steaks, cut of your choice
4 decent sized slices of Sourdough bread, or any bread of your choice
1/2 avocado
a handful or so of mixed lettuce or rocket
Method
Combine the Dijon, Worcestershire, BBQ and garlic in a bowl, and add the steaks to the mixture, turn to coat, and leave them there while your pan is heating up.
Once your pan is nice and hot, cook the steaks to your liking. I like my rare to medium rare.
Slice your Sourdough nice and thick, and toast.
Spread some more Dijon on the toasted bread, then smoosh the avocado on top.
Then top with some of the greens and add your steak.
I like a little more BBQ sauce on my steak, not too much. Then top with some more greens, and top with another slice of bread. Then EAT!
It was everything I wanted it to be. I was totally satisfied. If I had not been so steak sandwich focused, I would probably have done some chips or something to have with it, but as it was, the sandwich was plenty on it's own.
Saturday, the boy and I ventured to Rooftop Movies. It's a cinema they've created on top of one of the car parks in the city. It's got astro turf, deck chairs, cute little caravans, and plastic flamingos.
It's totally my type of joint. We went to see a Lynch double of Blue Velvet and Wild at Heart. It was super pleasant, and we really enjoyed the venue. We sneaked off to Billy Lee's for a post movie meal of BBQ pork, Schezuan chicken and garlic broccoli. Then, we may have stayed up all night watching Dr Who....
Seeing as we did stay up all night watching Dr Who, Sunday was spent in bed, drifting in and out of sleep and watching Friends on DVD. I finally decided to get up about 6pm. This was mainly because I was hungry. I was hungry for cake. So, I made some. Dr Blythe told me about this recipe for just 2 cupcakes. So, this was the perfect opportunity to try it out. (you can find the original recipe here, but the one I've posted below I've modified slightly)
Ingredients
3 Tbsp plain flour
2 Tbsp caster sugar
1 1/2 tsp cocoa powder
1/2 of a 1/4 tsp of baking soda
a pinch of salt
2 Tbsp cold water
1 tbsp melted butter
a few drops of vanilla extract
For the Icing
1 Tbsp butter, melted
1 Tbsp + 2 tsp cocoa powder
3 Tbsp icing sugar
1 tsp water (have more on hand in case the mixture is too thick. Just keep adding a small amount and whisking until it's a smooth workable consistency. Not too runny and not too thick)
Method
Preheat the oven to 180C and line a cupcake tin with 2 papers. Put them in the middle of the tin.
Whisk all of the dry ingredients together. Then whisk the wet ingredients together in a separate bowl. Then pour the wet ingredients into the dry ingredients, and whisk until combined.
Divide the batter between the 2 cupcake papers (should be about half to 3/4's full).
Pop them in the oven and bake for about 10-12 minutes, or until a skewer inserted comes out clean. Put the cakes on a cooling rack.
For the icing, combine all the ingredients, and whisk until combined. You want the icing to be glossy and a little bit thick, but still nice and workable. Pop it in the fridge for 5-10 minutes to cool (it will be hot from the melted butter). I just left mine until it was cooler, but still slightly warm. Whisk it again, and slather it on top of the cupcakes. You should probably wait until the cupcakes are totally cool, but I couldn't. Mine were still slightly warm, but not too warm as to melt the icing.


These actually weren't bad cakes. I was quite surprised. They actually impressed me so much, that I'm working on my own 2 cupcake vanilla recipe (because I'm not a huge fan of chocolate cake). I tried to eat one last night and save one for today. But I ate them both last night. They were so simple to make, from ingredients I always have on hand, I'll be whipping these up every time I feel like cake. Well, maybe not every time, because then I'd be making them every day, and I might as well just make a normal sized batch, but, you get what I mean. Right?
Then, bunny tried to help me do the washing up....
Around this time, I start to get terribly excited. You see, it's only a little over a month until my birthday. I know I'm getting slightly (only slightly) too old to get this excited. But I can't help it. Birthday, Easter, Christmas; I get as excited as I was when I was little. Well, maybe not as excited, I can sleep the night before now! And while this year is not any sort of 'special' birthday (still 2 years away from the big 30...I have mixed feelings about this, I want to turn 30 as I feel I've accomplished quite a lot in my 20's, but, I won't be in my 20's anymore) I'm still very much looking forward to it.
I start to make lists. I love lists, and I find any, ANY, excuse to make a list. I have all sorts of wish lists of things that I want. And around this time, I start going through them all, and picking things that people can (realistically) buy me for my birthday. These lists are full of things I've coveted for ages, some things have been on there for years, YEARS! And, while I understand that things like a 3 series BMW, is something I"m going to have to buy myself, and not expect someone else to buy for me, it's been on there for a good 5 years. It will be ticked off one day.
This years list is full of cute little things, like this lamp, and flamingos. I also made up 10 little things I want the boy to buy me. I made this up while lying in bed one night, and now I have to have them. This is the list:
a little goat
a little llama
a little duck
4 little elephants
a little chicken
a little hippo and
a little piggy
I would actually love literal miniature versions of these animals, that you can pick up and carry around in your pocket, but I don't know that such a thing as teacup elephants exist :(
Although if they did, I would totally make them swim around in my giant teacup with a Loch Ness Monster head on their trunks.
Pinterest has also made it additively easy to list the things I want. Or 'pin' them, as the case may be. It makes you spend hours on the Internet hunting down things you want, just so you can pin them (you can see mine here). And then, you can spend even more hours pouring over things other people have pinned, and repinning them to your boards. I confess, I love it. And, I get a little thrill every time someone repins one of my pins.
So, I make all these lists, I spend hours looking at things to add to the list, and making sure then things I want actually do exist, and providing the web links to people so they can buy it, and really, any thing that's a bit quirky, pink, sparkly or is adorned with a pinup girl or a cupcake, I'm going to fall instantly in love with.
It's official. I've crossed something off The List of Goodness! Number 3 - Do something with my hair (The list has been updated to reflect this). I am now sporting (rather well, even if I do say so myself) cerise pink hair. I love it. I have also had quite a bit of length taken off, mostly at the back. I did wake up this morning with pink EVERYWHERE. I have a pink neck, pink shoulders and pink ears, and the boy just let me know he has a pink arm, from where my head was resting on in while we slept (awww)
So this is a before and after type post, and the grand unveiling of my new hair
The Beginning.
The first lightening
The second lightening
The third lightening, and 'inbetween' colour
TA DA! End result
And again (you can see some of my pink shoulder & neck)
So, that's 1 item down, only 15 to go!